
APPLIES TO: Admins
Last updated: October 23, 2023
Quick Links
- Overview
- Report Benefits
- Helpful Tips
- Using The Report
Overview
The purpose of this report is to show all transactions that occur within a facility during a specified timeframe. This report provides a quick view on all money coming in (payments and returns) and all money going out (purchases and refunds). It can be easily access and exported via mobile browser in addition to desktop.
Report Benefits
- Track all transactions.
- Advanced filters to help locate specific transactions.
- High level dynamic stats that adjust with selected filters.
- View all money coming/going with each individual item breakdown.
- Available on desktop and mobile.
Helpful Tips
Statistic Tooltips
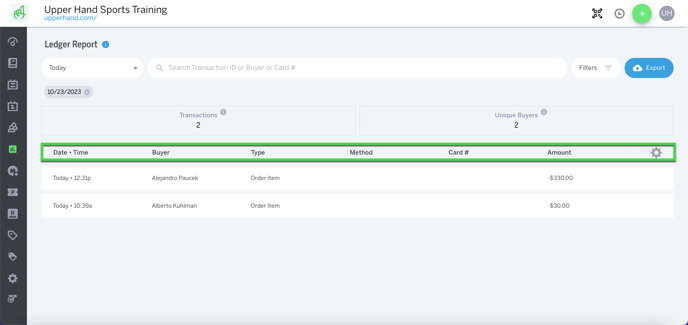
- Transactions: the total number of times money was exchanged (debits and credits).
- Unique Buyers: the total number of all clients who transacted.
Columns Explained
- Date & Time: the specific date and time that the order was first made.
- Buyer: the name of the client who purchased the order.
- Type: the type of transaction (i.e. Payment, Order Item, Refund, Membership Renewal, Schedule Payment, Waived Fee).
- Method: the method in which the order was paid (credit card, cash, check, pay later, or payment plan).
- Card #: The last 4 digits of the card that was used for the transaction.
- Amount: the total dollar value of the transaction.
Using the Report
- To access the Report, hover over the navigation bar on the left hand side and click Report > Ledger.
- This report will always initially display transactions that occurred on the current day.
- From here, you can filter the date range by Yesterday, Today, This Week, Last Week, This Month, Last Month, This Year, Last Year and Custom.
- You have the ability to search by a specific Transaction ID, Buyer Name or Card #.
- You can also filter by Type (Payment, Refund, Payment Plan, Order Item, Membership Renewal, Scheduled Payment, Waived Fee, and Failed Order), Minimum Amount, and Maximum Amount.
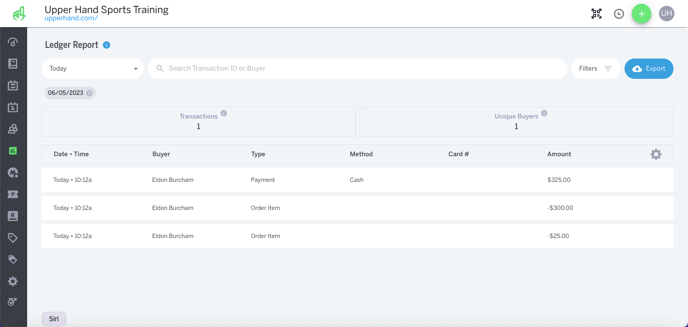
- To add the Transaction ID column, click the gear icon. Next, click Transaction ID.
- Note: you also have the ability to deselect any of the preset columns.
- Looking at the Transaction ID column, you can see that the ID is the same for all 3 lines. This is because these Order Items make up a single Order (which can be found on the Orders report).
- The Order Items show that two items were purchased for $25.00 and $300.00 each. The top line shows that this order has been paid via Cash for a total of $325.00.
- If you would like to export the report via .csv file, you can do so by clicking on the cloud icon.
Note: If you see a failed order, that could be for a number of different reasons (incorrect card information, insufficient funds, expired card, etc.). A failed order will show up on the ledger report and show the amount that the attempted order was for but that does not mean the payment went through.