
APPLIES TO: Admins
Last updated: June 4, 2024
Quick Menu
Using the Teams feature inside the Upper Hand app allows you to have players register online and see their game/practice schedule.
Create a Team:
- Select the Teams (jersey icon) on the left navigational panel
- Select + Create Team
- Complete the 5 tabs of information to fit your needs/preferences
- Click the Save button to save all changes
- Click the Post button to update the event status to 'Active' and open for registration
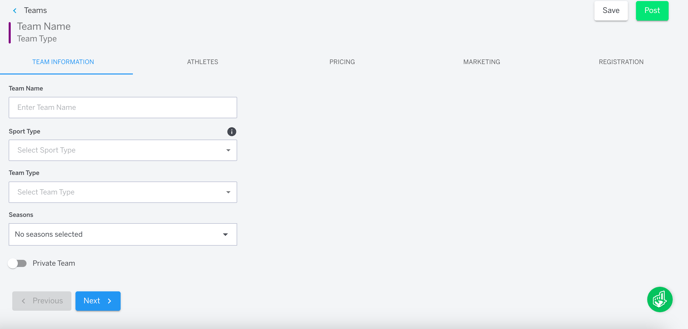
Team Information Tab
- Team Name: Enter the name of the team
- Sport Type: Information necessary for insurance and data purposes, if you do not see your sport listed, select Other or if the event is multi sport, just choose one
- Team Type: Select or add a new Team Type for the team. Team Types are categories meant to help organize Teams and make it easier for clients to find the right team
- Seasons: Add a season name to a team to let your participants know what season the team is associated with
- Private Team: To hide a team from being registered by the general public, toggle Private Team on
Athletes Tab
- Roster Size: Set the maximum amount of participants allowed to register for the team
- Age: Set the minimum and maximum participant ages
- Gender: Ability to select which gender the event applies to (Coed, Male, or Female), not a required field.
- Date of Birth: Set a date of birth range that a client must be before, after, or in between in order to sign up for the team
- Note: The Age and Date of Birth fields will restrict registration for those who do not fall into the preferred ranges and you cannot use both fields at the same time.
Pricing Tab
- Free Team: Allows the team to be priced completely free
- List Price: Add the price of team registration
- Payment Plans: The pricing automation allows you to create payment plans for the Team
- Note: You must hit Save before adding any payment plan automation and you must enter a List Price before Saving
- After initially saving, click Add Automation
- Click Add under Recurring Payments
- Click Create Plan
- Enter Plan Name
- Choose a Payment Date and enter Amount
- Click + Add Payment and repeat step until complete
- Click Save
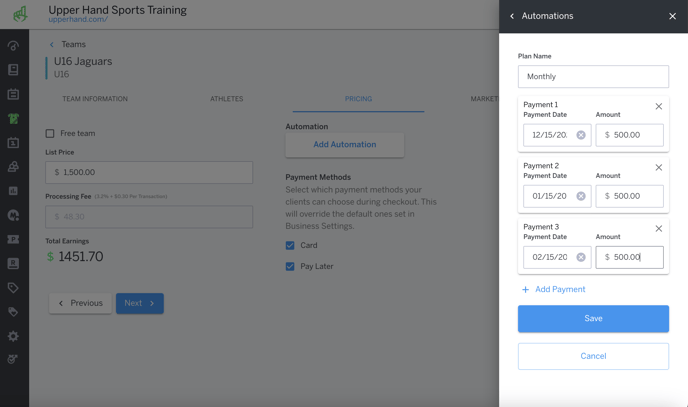
- Payment Methods: Select which payment methods your clients can choose during checkout
- Note: Remove Pay Later as a selected option if you would like to require payment at time of registration
Marketing Tab
- Team URL: Every team will generate a custom URL Link that can be copied from the marketing tab
- Tip: Useful for Private Teams to give specific access for registration
- Team Description: The team description will be shown on the landing page to give clients an in-depth understanding of what the team is
- Team Image: Add an image that represents your team
- Note: Images must be smaller than 3 megabytes and cannot be a pdf
Registration Tab
The registration section allows you to choose what information you would like to collect about players when they register for a team.
- Choose a Registration Field Category
- Click the drop down underneath the category to see all options
- Note: If you do not see a registration field option listed that you need to use, you can request a new registration field be created by sending an email to support@getupperhand.com
- After selecting a field, it will appear underneath Team Form Fields
- To make a field required, click the check box next to the field
- Learn how to create custom registration fields here
- Additional Notes:
- Client contact information will be collected during account creation and generally is not necessary for registration fields
- To access the registration field information input by a client, you will need to download the team registrations spreadsheet within the team