
APPLIES TO: Admins and Staff
Last updated: July 16, 2025
Point of Sale makes it easy for Admin and Staff to manually add an athlete to training and charge them on the spot.
Point of Sale
- After logging in to your account, you will see a green plus sign in the upper right hand corner of the page next to your profile picture or initials.
- When you click on the green plus sign, a drop down menu will appear. Click on Point of Sale.
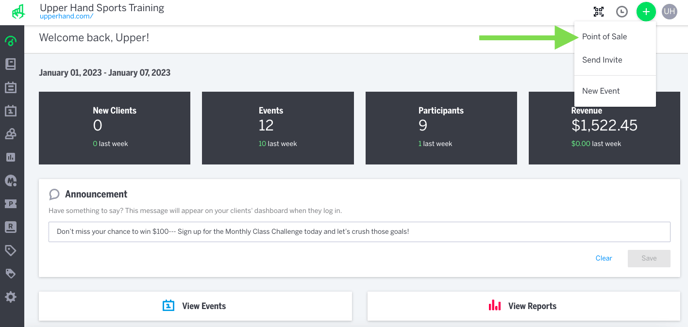
- A side bar will pop out from the right.
- Your clients are broken up into two sections
- Suggested Clients: these are your top 5 clients who historically have orders on that day of the week
- For example: If Rory typically comes in on Wednesdays and buying a drink after their lesson then they will appear in the Suggested Clients section on Wednesdays
- All Clients: All of your athletes with their primary account manager listed below their name.
- Suggested Clients: these are your top 5 clients who historically have orders on that day of the week
- You can also use the search bar to find a client's name. If you are adding a new client to training, click on the blue plus sign with the outline of a person. This will require you add their name, email address, phone number, date of birth, gender, and time zone. When you have finished entering all of this information, click the blue next button to add the new client.
- Note: When you enter a new clients' information, they will be sent an email to create their Upper Hand account. If you click on an athlete that you have invited to create an account, and they have yet to create one, you will be required to enter all of their information before you can assign them to an event.
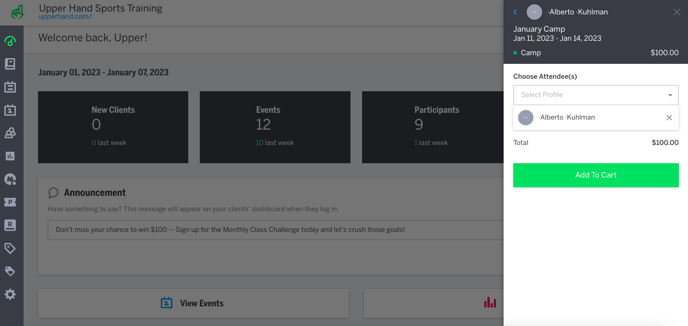
- The next screen will list all of the active memberships, credit passes, events and retail items.
- POS Favorites: each employee that has access to POS will be able to set items as their favorites, which will appear at the top of the items list each time they use POS, read more here
- Note: The memberships and credit passes are listed by price (low-to-high), events are listed in alphabetical order.

- Click on the event to manually register the new client. This is where you select the Package, Date and Time of when they will be training. Click the athlete's name in the Select Attendee(s) drop down. Next click the blue Book button, and then the green Add To Cart button.
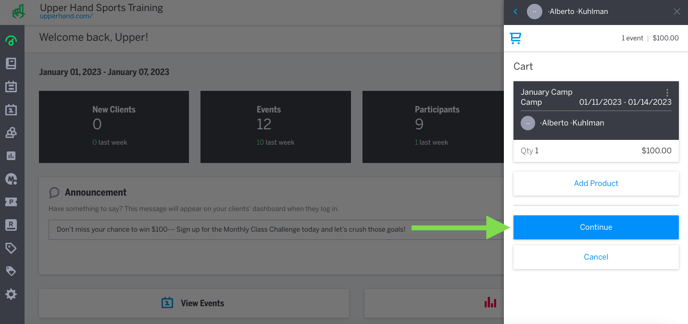
- The next screen is a view of your cart. Click the blue Continue button to go on to the summary page.
- Tip: If you want to sign them up for another event all you do is click Add Event in your cart and repeat steps 4-6.
- Fill Out Event Form: If you added mandatory registration fields during the event creation process.
- Coupon Code: You can enter a coupon code if you are offering one or also provide a manual discount by clicking on Add Discount. You can manually apply a dollar amount or percentage discount.
- Note: You won't be able to add a manual discount to a membership or payment plan.
- Order Note: This note will only be visible on the customer side and can be viewed in the orders drawer on the client profile or orders report
- Then click the blue Continue To Payment button.
- Tip: Select the check box next to Remove Sales Tax or Remove Service Fee if you don't want to charge a Sales Tax or Service Fee for this specific order.

- Here you can select a card they have on file, or enter a new card that they have provided. You can also select Pay Later, Cash or Check. Click the green Purchase button and you are good to go!
- Credit Card: Input the credit card number, card holder name, exp date, cvc
- Billing Details: Input the billing address on the credit card
- Note: this will help reduce the transaction fee
- Note: If you select Save Card it will save the card to their profile so you don't have to manually input the information in next time.
